 Tweet
Tweet
Hi all
I've got stacks of help from this forum over the past few months, so thought I'd give something back. Here are some tips I've picked up on creating fairly good trees/forests without commercial plugins.
For close-up (high poly) Trees:
Try the (free) L-System plugin from Blur Studios:
http://www.blur.com/Tech/zip/lsystem.zip
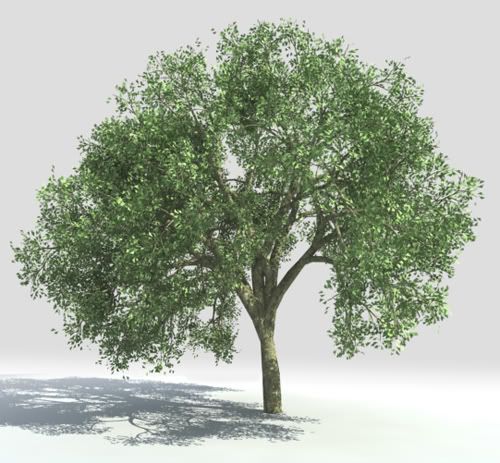
It's a strange animal, but you can find loads of L-System files on the net that have been created by others. An L-System basically describes a fractal algorithm which can be used to create trees, plants, insects(!), ornamental structures etc. etc. The Blur plugin even allows you to change material IDs at certain points on the Turtle's path (don't ask); ideal for creating leaves, and it comes with a few ready-made LS files, too. Here's a tree I made with the plugin:
Billboard Trees:
I don't know what RPC stands for, but I guess it means billboards? I often use the ForestLite plugin for large areas of billboard trees:
http://www.itoosoft.com/english/menu.php?id=download
The Lite version is free, but is limited in certain ways. For instance, you can only populate flat areas, not hillsides etc., but I still find it very useful. Create a closed spline which represents the area you want to fill with trees, create a Forest object, and select your spline. There are tutorials available from itoosoft, so I won't dwell on the Forest Plugin itself.
The Lite version only allows you to assign 1 material to each Forest object, so you can't have a variety of trees. I overcome this by creating multiple Forest objects in the same area, with different scatter options in each forest.
The material maps I use are often renders from a side-view on one of my L-System trees, which helps keep a consistent feel in my images and makes it easy to create textures with Alpha channels for opacity.
Billboard Texture Tips:
1. Giving your material a small amount (<50) of self-illumination will help keep your trees bright even if light glances off of the plane due to its angle to the main sunlight. Keep your specular levels and glossiness at zero to avoid highlights in animated fly-bys which can ruin the illusion.
2. To help minimise the light outlines that often appear around opacity-mapped objects, make the background colour of your image similar to that of the tree.
3. Make sure you save in a format such as TGA or TIFF, with an Alpha channel for opacity.
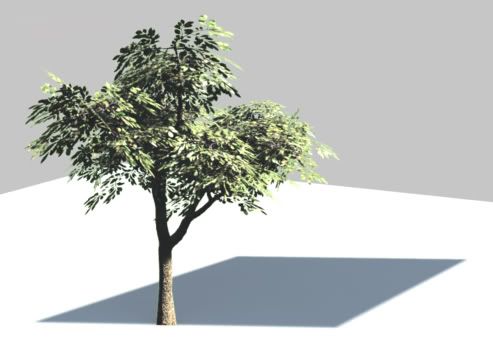
4. Make the tree fill the image, and ensure the trunk extends to the very bottom of the image, otherwise your trees might float above the ground:
Shadows:
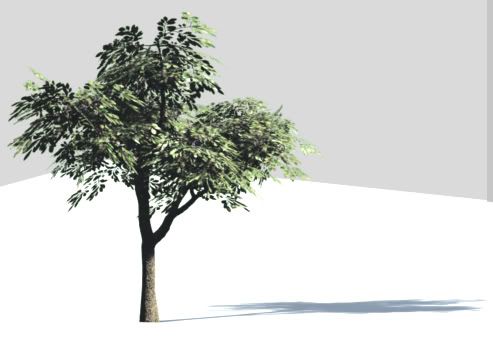
Casting shadows from opacity-mapped objects can be problematic with the standard Max Shadow mapped lights, since the opacity-mapping is ignored:
There is an additional shadow type available with the Forest plugin called xShadow which creates a shadow map which can deal with this problem, but it only works with the scanline renderer (and Mental Ray? Mental Ray? what's that?). However, I've found the xShadow to be problematic when using high-resolution shadow map sizes and, before you get excited, it ONLY works with Forest objects, not other opacity-mapped objects. Sorry.
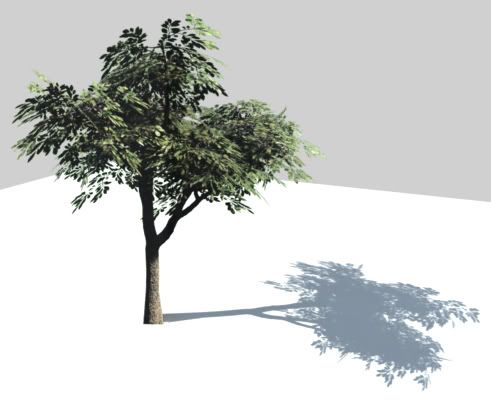
The best options then are ray-traced shadows (scanline renderer) or, of course, VRay shadows
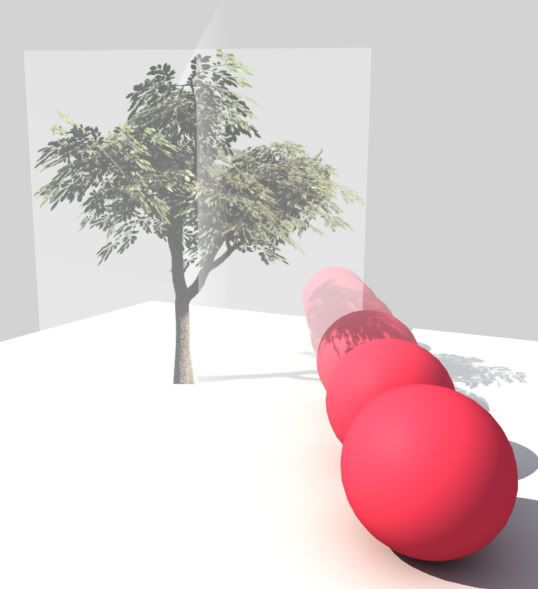
Whether you create billboard trees with the ForestLite plugin or create your own, it's a good idea to use a lookAt constraint to make sure they always face your camera (this can be done automatically with the plugin), so that the illusion of a solid tree is maintained from your camera view. This creates a new problem with shadow casting. If your main shadow-casting light is viewing the scene from the side of your camera, then some of your trees will cast long, skinny shadows:
I've found a workaround for this problem which works thus:
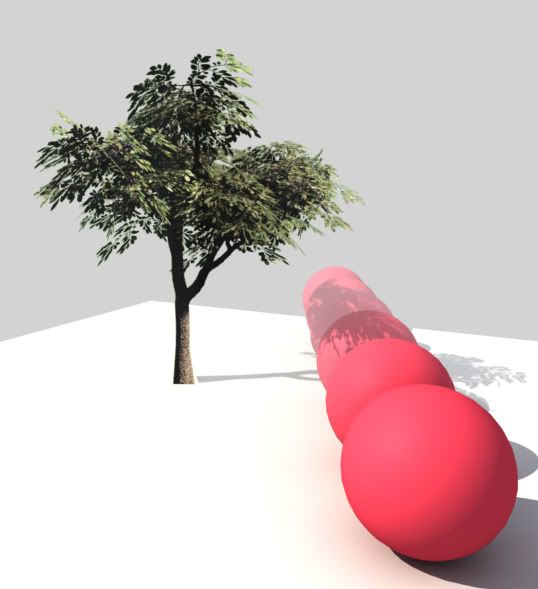
Create a copy of each tree plane (or forest object if using the ForestLite plugin), and turn the copy so that it is perpendicular to your shadow-casting light (do NOT use a lookAt constraint unless your main light is a spotlight or point light, which it probably won't be for outdoor scenes). This can be done with the rotation setting in the Forest plugin, after selecting NONE for the camera lookat setting.
In the object properties, turn off 'Cast Shadows' on the original tree/forest, and turn off 'Visible to Camera' and 'Visible to Reflection/Refraction' on the copy. This way, the original will not cast shadows, and the copy will ONLY cast shadows:

the result:
okay, not perfect, but pretty good, and easily good enough for far-off trees.
Fog:
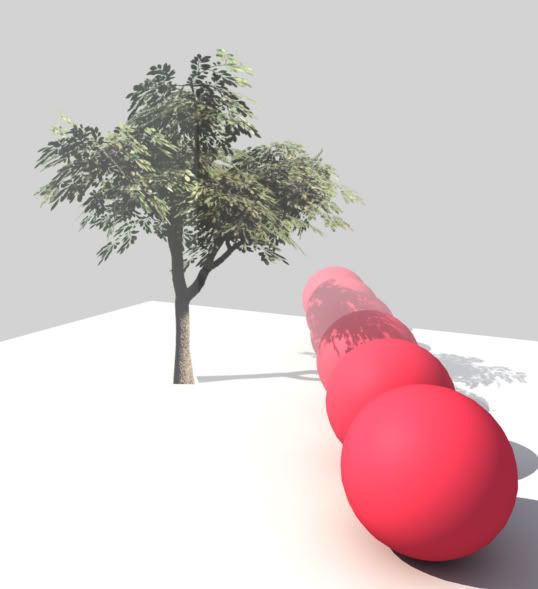
If you try to use fog with opacity-mapped trees, you will get some odd results:
This is because (insert technical stuff here). And that's why. The edges of the plane objects are visible. One workaround for this problem is this:
Select all your tree plane/forest objects, and in the object properties, uncheck 'Apply Atmospherics'. This will stop the edges of your planes being visible:
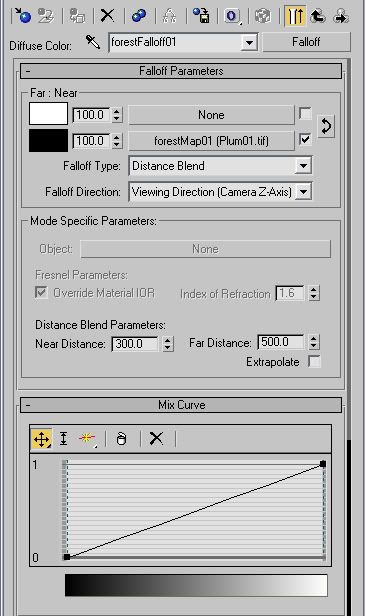
Your trees will look odd now, however, since they do not fade into the fog along with other objects in the scene. This can be emulated with a falloff map in the diffuse slot of the tree material:
set up the falloff map as a 'Distance Blend' with the tree texture in the Near: slot and make the Far: slot the same colour as your fog. If your far fog setting is 100%, then you can set the Near and Far Distances to the same as your camera ranges. Otherwise, you will need to interpolate. For example, if your far fog value is 25 and your camera ranges are 100-1000 then set the falloff Near Distance to 100 and the Far Distance to 4000. Get it? :
the result:
Transparency Levels:
When using a lot of transparent trees, VRay will often struggle with the number of overlapping faces and show the environment through your trees at odd places:

Increasing the 'Max transp. levels' in the 'VRay: Global switches' rollout can sometimes help, but I've had lots of scenes where it either doesn't help at all, or Max will crash during rendering. One work-around for this problem (which I learned on this forum) is to use displacement mapping to create a 'cut-out' of your tree at render-time:
Add the VRayDisplacementMod modifier to your tree plane/forest object. Apply your opacity tree map by dragging it from the material editor onto the Texmap (None) button. Make sure you use the 2D Mapping type, then set the amount to 2 and set the water level at 1. The water level option will effectively 'trim away' the plane objects where you want them transparent:

Note that using this method creates a lot of geometry at render-time, but personally I have had no problems with it yet. If you adopt this method, then you don't need opacity-mapped materials at all, which will allow you to use proper fog and even shadow-mapped shadows.
One Last Thing: Motion Blur
This is a general tip, not just for scenes with trees, but I've included it here because one good way to avoid the eerie "Whoa, those trees are looking at me!" feeling you get from animated sequences which use billboard trees is to use lots of motion blur on the forest objects. Using heavy motion blur with opacity-mapped objects, however, can increase your render times four-fold. So here's what I often do:
Render your animation in VRay with no motion blur at all (I usually create a series of TIFF images). Create a Standard Material whose Opacity, Specular Level and Glossiness are all zero, and apply it to everything in the scene. This effectively makes everything invisible, but since their Visibility values are still 1, Max will still render the motion blur. Select everything, and in the Properties, Motion Blur pane, set the Motion Blur multiplier to whatever you need (I use 1.0), select the 'Image' radio button, and make sure the 'Enabled' checkbox is ticked.
Now set up your environment as the rendered sequence you made earlier, mapped to Screen coordinates. Render the scene with the scanline renderer, remembering to turn on Image Motion Blur, to a new AVI or TIFF Sequence, and Piff Paff Poof! Very quick motion blur. Obviously this is not as good as the VRay Motion Blur, but when you're on a deadline, it's a quick fix, and you can create blurred scenes with VRay Free using this method.
Here's a pic I made using the L-System and ForestLite plugins, using some of the techniques above:

I'm sure many of you have stuff to add to this post, so please do. I hope some of it's useful to someone out there.
Now I'm gonna make like a tree and leave...
George
I've got stacks of help from this forum over the past few months, so thought I'd give something back. Here are some tips I've picked up on creating fairly good trees/forests without commercial plugins.
For close-up (high poly) Trees:
Try the (free) L-System plugin from Blur Studios:
http://www.blur.com/Tech/zip/lsystem.zip
It's a strange animal, but you can find loads of L-System files on the net that have been created by others. An L-System basically describes a fractal algorithm which can be used to create trees, plants, insects(!), ornamental structures etc. etc. The Blur plugin even allows you to change material IDs at certain points on the Turtle's path (don't ask); ideal for creating leaves, and it comes with a few ready-made LS files, too. Here's a tree I made with the plugin:
Billboard Trees:
I don't know what RPC stands for, but I guess it means billboards? I often use the ForestLite plugin for large areas of billboard trees:
http://www.itoosoft.com/english/menu.php?id=download
The Lite version is free, but is limited in certain ways. For instance, you can only populate flat areas, not hillsides etc., but I still find it very useful. Create a closed spline which represents the area you want to fill with trees, create a Forest object, and select your spline. There are tutorials available from itoosoft, so I won't dwell on the Forest Plugin itself.
The Lite version only allows you to assign 1 material to each Forest object, so you can't have a variety of trees. I overcome this by creating multiple Forest objects in the same area, with different scatter options in each forest.
The material maps I use are often renders from a side-view on one of my L-System trees, which helps keep a consistent feel in my images and makes it easy to create textures with Alpha channels for opacity.
Billboard Texture Tips:
1. Giving your material a small amount (<50) of self-illumination will help keep your trees bright even if light glances off of the plane due to its angle to the main sunlight. Keep your specular levels and glossiness at zero to avoid highlights in animated fly-bys which can ruin the illusion.
2. To help minimise the light outlines that often appear around opacity-mapped objects, make the background colour of your image similar to that of the tree.
3. Make sure you save in a format such as TGA or TIFF, with an Alpha channel for opacity.
4. Make the tree fill the image, and ensure the trunk extends to the very bottom of the image, otherwise your trees might float above the ground:
Shadows:
Casting shadows from opacity-mapped objects can be problematic with the standard Max Shadow mapped lights, since the opacity-mapping is ignored:
There is an additional shadow type available with the Forest plugin called xShadow which creates a shadow map which can deal with this problem, but it only works with the scanline renderer (and Mental Ray? Mental Ray? what's that?). However, I've found the xShadow to be problematic when using high-resolution shadow map sizes and, before you get excited, it ONLY works with Forest objects, not other opacity-mapped objects. Sorry.
The best options then are ray-traced shadows (scanline renderer) or, of course, VRay shadows
Whether you create billboard trees with the ForestLite plugin or create your own, it's a good idea to use a lookAt constraint to make sure they always face your camera (this can be done automatically with the plugin), so that the illusion of a solid tree is maintained from your camera view. This creates a new problem with shadow casting. If your main shadow-casting light is viewing the scene from the side of your camera, then some of your trees will cast long, skinny shadows:
I've found a workaround for this problem which works thus:
Create a copy of each tree plane (or forest object if using the ForestLite plugin), and turn the copy so that it is perpendicular to your shadow-casting light (do NOT use a lookAt constraint unless your main light is a spotlight or point light, which it probably won't be for outdoor scenes). This can be done with the rotation setting in the Forest plugin, after selecting NONE for the camera lookat setting.
In the object properties, turn off 'Cast Shadows' on the original tree/forest, and turn off 'Visible to Camera' and 'Visible to Reflection/Refraction' on the copy. This way, the original will not cast shadows, and the copy will ONLY cast shadows:
the result:
okay, not perfect, but pretty good, and easily good enough for far-off trees.
Fog:
If you try to use fog with opacity-mapped trees, you will get some odd results:
This is because (insert technical stuff here). And that's why. The edges of the plane objects are visible. One workaround for this problem is this:
Select all your tree plane/forest objects, and in the object properties, uncheck 'Apply Atmospherics'. This will stop the edges of your planes being visible:
Your trees will look odd now, however, since they do not fade into the fog along with other objects in the scene. This can be emulated with a falloff map in the diffuse slot of the tree material:
set up the falloff map as a 'Distance Blend' with the tree texture in the Near: slot and make the Far: slot the same colour as your fog. If your far fog setting is 100%, then you can set the Near and Far Distances to the same as your camera ranges. Otherwise, you will need to interpolate. For example, if your far fog value is 25 and your camera ranges are 100-1000 then set the falloff Near Distance to 100 and the Far Distance to 4000. Get it? :
the result:
Transparency Levels:
When using a lot of transparent trees, VRay will often struggle with the number of overlapping faces and show the environment through your trees at odd places:
Increasing the 'Max transp. levels' in the 'VRay: Global switches' rollout can sometimes help, but I've had lots of scenes where it either doesn't help at all, or Max will crash during rendering. One work-around for this problem (which I learned on this forum) is to use displacement mapping to create a 'cut-out' of your tree at render-time:
Add the VRayDisplacementMod modifier to your tree plane/forest object. Apply your opacity tree map by dragging it from the material editor onto the Texmap (None) button. Make sure you use the 2D Mapping type, then set the amount to 2 and set the water level at 1. The water level option will effectively 'trim away' the plane objects where you want them transparent:
Note that using this method creates a lot of geometry at render-time, but personally I have had no problems with it yet. If you adopt this method, then you don't need opacity-mapped materials at all, which will allow you to use proper fog and even shadow-mapped shadows.
One Last Thing: Motion Blur
This is a general tip, not just for scenes with trees, but I've included it here because one good way to avoid the eerie "Whoa, those trees are looking at me!" feeling you get from animated sequences which use billboard trees is to use lots of motion blur on the forest objects. Using heavy motion blur with opacity-mapped objects, however, can increase your render times four-fold. So here's what I often do:
Render your animation in VRay with no motion blur at all (I usually create a series of TIFF images). Create a Standard Material whose Opacity, Specular Level and Glossiness are all zero, and apply it to everything in the scene. This effectively makes everything invisible, but since their Visibility values are still 1, Max will still render the motion blur. Select everything, and in the Properties, Motion Blur pane, set the Motion Blur multiplier to whatever you need (I use 1.0), select the 'Image' radio button, and make sure the 'Enabled' checkbox is ticked.
Now set up your environment as the rendered sequence you made earlier, mapped to Screen coordinates. Render the scene with the scanline renderer, remembering to turn on Image Motion Blur, to a new AVI or TIFF Sequence, and Piff Paff Poof! Very quick motion blur. Obviously this is not as good as the VRay Motion Blur, but when you're on a deadline, it's a quick fix, and you can create blurred scenes with VRay Free using this method.
Here's a pic I made using the L-System and ForestLite plugins, using some of the techniques above:
I'm sure many of you have stuff to add to this post, so please do. I hope some of it's useful to someone out there.
Now I'm gonna make like a tree and leave...
George


 .
.

Comment