OK... it seems a lot of you know that you can rebuild the renders that are split out of the vray g-buffer, but may not be clear on how to do it. Vlado did a very good breakdown on what the elements are here...
http://www.spot3d.com/vray/help/VRay...buffer.htm#ex2
But this may help you.
The following is a very basic breakdown of how to reassemble a vray image in a compositing program. I am showing it to you in a very straightforward node breakdown, but this can be done in AE or any other package. First thing... you need to be in Linear Color Space the whole time since many of these elements such as Raw GI will be linear.
Lets start by showing the different g-buffers that are needed:
The core is this: the Diffuse. All it is a solid color of what comes out of diffuse, no shading. If you have a texture, it is a texture, a color is a color.

The light is then broken down into direct and indirect lighting. Use the RAW versions.


To get the effected diffuse of these, you multiply them by the diffuse
SO if you take the RawGI and multiply it by the diffuse, and you take the RawLight and do the same, you get the Diffuse direct light and the Global Illumination light.
They look like this:


So now you have the two basic elements of light: the direct light and the GI light (in terms of diffuse light). You can even think of it as key and fill. Light is additive, so all you need to do combine them is the add them together in the comp.
But there are still some pieces missing. And that is your specular light. While Vray really considers specular as a reflection, the cool thing is that it will separate out the reflection of a light as specular and reflection as reflection. Think of it in the same way as the direct light and the GI light. Those two passes look like this:


These two passes can be added to as well. By the way, if you have refraction or self-illumination or things that get split out, you will have to add them too.
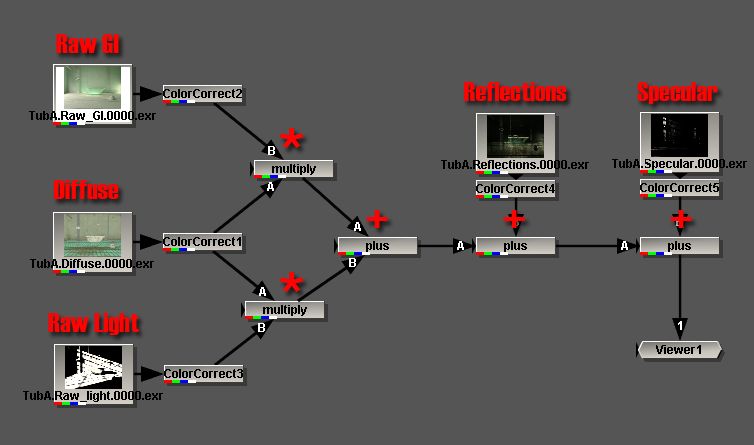
So this is how it looks in a diagram:

I am showing some color correct nodes in there since that is what you want to do with this.
You combine all of this: (Diffuse * GI) + (Diffuse * Light) + Specular + Reflection, and you get the same image that you rendered, which is this:

OK great, so you got the same thing you started with, what good is that? Well if you separate things, you have a lot of power to adjust it in post. First thing, I saved everything as full floating point unclamped color. So I already have the power of adjusting the exposure and the gamma of the image. Here are some examples of that:


Ok, but let’s say you want to desaturate the GI and maybe increase the contrast on it a bit. You could do that in Vray GI dialogue and redo the render or you could do a color correction on the Raw GI pass, and you get this:

Want to decrease the intensity of the sunlight? No problem, just adjust the RawLight pass:

Want to increase the reflection and maybe darken everything else a bit? No problem. Simply, darken the diffuse pass, and lighten the reflection pass:

Anyway, I hope this helps you guys.
http://www.spot3d.com/vray/help/VRay...buffer.htm#ex2
But this may help you.
The following is a very basic breakdown of how to reassemble a vray image in a compositing program. I am showing it to you in a very straightforward node breakdown, but this can be done in AE or any other package. First thing... you need to be in Linear Color Space the whole time since many of these elements such as Raw GI will be linear.
Lets start by showing the different g-buffers that are needed:
The core is this: the Diffuse. All it is a solid color of what comes out of diffuse, no shading. If you have a texture, it is a texture, a color is a color.

The light is then broken down into direct and indirect lighting. Use the RAW versions.


To get the effected diffuse of these, you multiply them by the diffuse
SO if you take the RawGI and multiply it by the diffuse, and you take the RawLight and do the same, you get the Diffuse direct light and the Global Illumination light.
They look like this:


So now you have the two basic elements of light: the direct light and the GI light (in terms of diffuse light). You can even think of it as key and fill. Light is additive, so all you need to do combine them is the add them together in the comp.
But there are still some pieces missing. And that is your specular light. While Vray really considers specular as a reflection, the cool thing is that it will separate out the reflection of a light as specular and reflection as reflection. Think of it in the same way as the direct light and the GI light. Those two passes look like this:


These two passes can be added to as well. By the way, if you have refraction or self-illumination or things that get split out, you will have to add them too.
So this is how it looks in a diagram:

I am showing some color correct nodes in there since that is what you want to do with this.
You combine all of this: (Diffuse * GI) + (Diffuse * Light) + Specular + Reflection, and you get the same image that you rendered, which is this:

OK great, so you got the same thing you started with, what good is that? Well if you separate things, you have a lot of power to adjust it in post. First thing, I saved everything as full floating point unclamped color. So I already have the power of adjusting the exposure and the gamma of the image. Here are some examples of that:


Ok, but let’s say you want to desaturate the GI and maybe increase the contrast on it a bit. You could do that in Vray GI dialogue and redo the render or you could do a color correction on the Raw GI pass, and you get this:

Want to decrease the intensity of the sunlight? No problem, just adjust the RawLight pass:

Want to increase the reflection and maybe darken everything else a bit? No problem. Simply, darken the diffuse pass, and lighten the reflection pass:

Anyway, I hope this helps you guys.


Comment