Announcement

Collapse
No announcement yet.

(FULLY RENDERED) silvershadow's "eye candy"

Collapse
X
 
  • Filter
  • Time
  • Show
Clear All
new posts

  • #31
    Re: (FULLY RENDERED) silvershadow's "eye candy"

    OMG!! thats amazing! very inspirational!! I think tutorial will be in demand specially the mapping or displacement that has the algae!!

    Comment


    • #32
      Re: (FULLY RENDERED) silvershadow's "eye candy"

      amazing!!!! simply beautiful. i am blown away by this image silver... hope they will put this in the main page of ASGVIS or in the gallery. your mastery of texturing and modelling is superb. thanks for sharing mate.
      http://www.nomeradona.blogspot.com/
      http://www.sketchupvrayresources.blogspot.com/
      http://www.nomeradonaart.blogspot.com/

      Comment


      • #33
        Re: (FULLY RENDERED) silvershadow's "eye candy"

        Belíssimo!!! BRAVO!!!

        Comment


        • #34
          Re: (FULLY RENDERED) silvershadow's "eye candy"

          Thanx guys for the comments so far. ;D
          Ok here are the nitty gritty stuff you requested and how things were done
          (Rendered in Vray for sketchup)
          I broke up the rendering process into 3 parts, the right side & water as one, the stone posts and its base as a second render, and the third is the cobbles and the left buildings
          Called it part 1,2 and 3. So. Part one rendered quite fast25 to 30 min, part 2 rendered also in about 25 to 30 minutes...and part 3 rendered in about 80 hours. yea. It has to do with the displacement map and somehow it gave me uphill in the rendering time, so i just let it finished. Got all 3 parts, i photoshopped it together as if it was one complete render. Un textured, the file size was about 17mb, textured was around 82.1mb. Waaay more than i thought it would turn out to be.

          Texturing this thing was also a head scratcher, i know i am really good in photoshop and post process my models normally to death, so this time i wanted to build something that i can proudly say HEY, this is all textured and not photoshopped. It took longer but this is how i did it. It was kinda like other applications work doing UV mapping, so i made my own plates. I took a face, rotated faces so that all of that specific face is flat, and use that as a guide to put textures on via photoshop.So a lot of baking and textures are overlayed ect to create one single texture. Once im happy, i took them into sketchup, scaled it till the face match exactly, and then projected it onto it.
          ( and i think i will texture all my future models like this )

          Below is what I used mainly to build this model.
          Note that all of them are resized so if you guys want a specific texture you like (which is very unlikely lol) i will post that one for you in a bigger resolution.

          http://www.box.net/shared/3pgm68xkw4

          Comment


          • #35
            Re: (FULLY RENDERED) silvershadow's "eye candy"

            Great explanation.. makes it much more clear for me!

            Because you said you don't mind I got some material requests: especially those old walls with the green moss and the cracks in it.. Simply look great!
            Also the cobblestones and the brown door would be welcome, but i don't wnt you to spend your whole day uploading

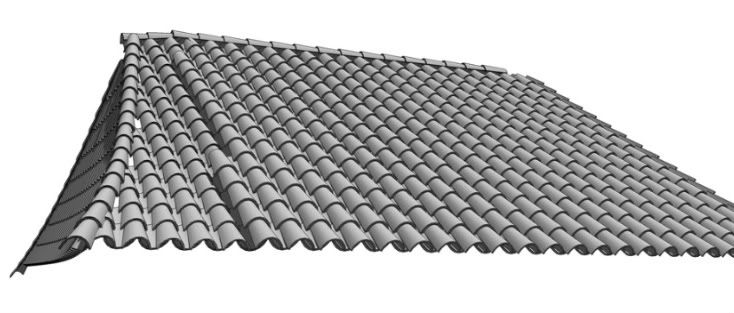
            There's bye the way one thing i still don't get: the rooftiles (on the house left).
            You made components of them you said, but they do all have an other texture (like the overal texture in your overview). Do you first make them fit exactly like the tiles on the photo and then project the texture on it or??

            thnx.. looking already forward to your next work!

            Comment


            • #36
              Re: (FULLY RENDERED) silvershadow's "eye candy"

              Hi there.
              The roof tiles were in the beginning symbols to save up some space but as soon as i got to the thing to texture, i had to expode it. To get the texture on to it was not perfect mapping. I just took the texture, rotated to to be angled the same as the roof and then made it quite bigger so the projections does not show clearly a different tile sitting on top of that. So if you ended up with a row of tiles that does not look right, i just re positioned the texture and dumped it on again for that row. Also a lot of those individual textures, not the wall textures been brightness and contrasted in sketchup.
              I will upload the textured and then you can choose which ones you want.

              http://www.box.net/shared/jd9bj3i0wc

              Comment


              • #37
                Re: (FULLY RENDERED) silvershadow's "eye candy"

                Hi Silver! Stunning work, this time! I'm really impressed: best compliments!
                Would you be so kind to share one of your modeled roof tiles? I'm trying to achieve one since a year but i'm never satisfied... :-\

                Comment


                • #38
                  Re: (FULLY RENDERED) silvershadow's "eye candy"

                  here you are.

                  http://www.box.net/shared/lj19nkagwk

                  Comment


                  • #39
                    Re: (FULLY RENDERED) silvershadow's "eye candy"

                    silver_shadow your an example to all of us, to share things that mean hard work for you like those tiles and share them to all of us, im really gratefull brother, yyou inspire me to contribute more with this forum. thx bro.
                    btw i visit the skp forums because of the bezier plugin but a message appears "You do not have the required permissions to view the files attached to this post." i allready submit to the forum so dont know why im not abble to see the files, any suggestion will be much appreciated.

                    Comment


                    • #40
                      Re: (FULLY RENDERED) silvershadow's "eye candy"

                      THANK YOU A LOT SILVER! YOU'RE SO KIND! ;D

                      Comment


                      • #41
                        Re: (FULLY RENDERED) silvershadow's "eye candy"

                        hee he pleasure. i can't wait to start on my new eye candy model.
                        ;D ;D ;D

                        Comment


                        • #42
                          Re: (FULLY RENDERED) silvershadow's "eye candy"

                          texturing is amazing, but what impressed me the most is the model, cant understand yet how you do that but congratulations, one of the best renders i have seen done in sketchup, lots of max or maya renders are not as impressive as this one.
                          abusing of you kindness id really like to see you visopt because i never get exteriors right if you could share that would be awesome!

                          Comment


                          • #43
                            Re: (FULLY RENDERED) silvershadow's "eye candy"

                            Hey silver shadow...amazing work. I just have one question, where were you able to find such textures? Especially the wall with the crack?

                            Comment


                            • #44
                              Re: (FULLY RENDERED) silvershadow's "eye candy"

                              Hi Nuder.
                              Most my wall textures were baked. I made them myself. Layers and layers of textures overlayed on top of each other to create a unique texture. All the bits and pieces of images i got from CGTEXTURES.COM, but that is non repetitive textures, and actually only good for dirtmaps and creating custom textures from those images.

                              Comment


                              • #45
                                Re: (FULLY RENDERED) silvershadow's "eye candy"

                                Nectaris
                                Here is the last visopt i used. Just not that this visopt is set that you cannot prieview your final render, so for testing purposes, change your render engine to light cache, and when youre happy change it to QMC again. Hope this helps.

                                http://www.box.net/shared/jdpistyg48

                                Here is how i set up the lighting.
                                I used omni lights because they reached the furthest in shading. Also i looked at what other CG artist were doing and 99% of them uses multiple light sources instead of actual sky. So i tried this way and seemed to worked.
                                PLAN

                                SIDE

                                LIGHT SETTING

                                Comment

                                Working...
                                X