Announcement

Collapse
No announcement yet.

max tips & tricks

Collapse
X
 
  • Filter
  • Time
  • Show
Clear All
new posts

  • #46
    I need a trick but can't find it.

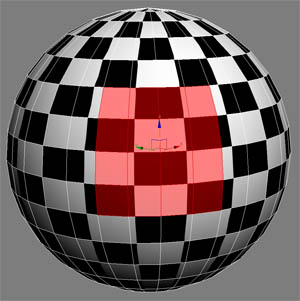
    How I can make my selected face color 50% transparant?? I wanne be able to see the texture shine through the selected face color. I know it's possible because the guys from cg-academy are doing it on their uv unwrapping dvd, but I can't see what they are doing. Since I see no clicking it must be a keyboard shortcut. I checked the help and can't find anything about it!


    This should show the checker texture too, at least a little bit:
    Aversis 3D | Download High Quality HDRI Maps | Vray Tutorials | Free Texture Maps

    Comment


    • #47
      I wouldn't know, sorry. I've got a question too: there must be keyboard key or so to turn your pointer into an full-viewport crosshair. Very useful to align objects etcetera. DOes anyone know how to toggle that specific pointer gizmo mode?
      Sevensheaven.nl — design | illustration | visualization | cartoons | animation

      Comment


      • #48
        hi flipside,
        don't know if its what you're searching fore, but press f2 in selected poly mode. maybe that helps
        Jonas

        www.jonas-balzer.de
        www.shack.de

        Comment


        • #49
          f2 makes the red dissappear completely, so you don't see the selection anymore. Maybe I'll better email the cg-academy people
          Aversis 3D | Download High Quality HDRI Maps | Vray Tutorials | Free Texture Maps

          Comment


          • #50
            Id use 2 unwrapps...

            I would use 2 unwrapp modifiers set 2 different ids.Checker is id 1 in the first unwrap and the red plane is id 2 in unwrap number 2. Then u create a composite material with those ids and use an additional opacity map for the red area. Thats what i would do. Havent tested it though with the transparenzy.

            Ralf

            Comment


            • #51
              Oh i forgot my tip..

              Actually i just found this little button. It when using the uvunwrapp modifier. Once you click edit and the screen appears to edit the coordinates click on option. Then you should see a field called constant update. This will help a lot while aligning your maps in the viewport.

              Hope it helps someone

              Ralf

              Comment


              • #52
                Just found this out, and it's blowing my mind...

                Walkthrough mode!

                Set up a camera (in my case interior).

                On the bottom right of your max interface>go to Truck (the hand)>hold click and switch to 'Walk through'>Shift+drag in your camera viewport>Ta-daaa!

                Oh, use your old skool doom controls for forward, back and strafe...Alternatively works with arrow keys...

                You can decrease/increase speed with the square brackets keys.

                ...I'm searching for the 'Fire Button'.....
                Needs more cowbell

                Comment


                • #53
                  i think there's a shortcut for the wasd camera...
                  It *should* be uparrow to activate it.

                  Also, pressing CTRL+C in any perspective viewport will create a camera, and look through it, preserving that viewport's point of view.

                  I find also very useful to use dummy objects as references for complex SRT on object and subobjects: create a dummy, position it where the center of the transformation should be, choose "Pick" from the reference coord. system dropdown, then pick the dummy, and finally choose "use transform coordinate center" by the side the aforementioned dropdown. If done properly, the center of your SRT gizmo will snap in the middle of the dummy.

                  Using renderers other than VRay can permanently impair one's ability to chose good versus evil.
                  Avoid at all costs

                  Lele

                  Lele

                  Comment


                  • #54
                    Originally posted by flipside
                    I need a trick but can't find it.

                    How I can make my selected face color 50% transparant?? I wanne be able to see the texture shine through the selected face color. I know it's possible because the guys from cg-academy are doing it on their uv unwrapping dvd, but I can't see what they are doing. Since I see no clicking it must be a keyboard shortcut. I checked the help and can't find anything about it!


                    This should show the checker texture too, at least a little bit:
                    Here you go:

                    You need to be in Edit Mesh & Running Direct3D and it happens automatically, no settings or keyboard shortcuts needed. Hope it helps, took me a long time to figure that one out.
                    | LinkedIn | Twitter | JCanimator.com |

                    Comment


                    • #55
                      not quite.
                      Depending from teh card, you might need to have the viewport transparency set to BEST for it to happen.
                      Some cards just don't have the "fast" transparency mode, and need no change of settings.

                      Lele

                      Comment


                      • #56
                        don't remember if it said before but you can scale the timeline (instead of using the timeline cofigoration) by pressing ctrl + alt + right mouse or left mose or middle mouse on the timeline and slide sides ,try it on both sides of the time slider , each button (left or right does somthing diffrent .
                        cool while animating.
                        http://www.3dvision.co.il

                        Comment


                        • #57
                          gilicom:
                          That tip just made my day! Thanks!

                          Comment


                          • #58
                            glad to help gilpo (use also middle mouse)
                            http://www.3dvision.co.il

                            Comment


                            • #59
                              nice tip gilicom, there is also a utility I found on script spot and have been using for a while called "Key Zoom" basically where ever you are on the time line, key zoom will zoom in to that point as much as you want and then you can hit the reset button or close the floater and the timeline resets back to normal.
                              Cheers,
                              -dave
                              ■ ASUS ROG STRIX X399-E - 1950X ■ ASUS ROG STRIX X399-E - 2990WX ■ ASUS PRIME X399 - 2990WX ■ GIGABYTE AORUS X399 - 2990WX ■ ASUS Maximus Extreme XI with i9-9900k ■

                              Comment


                              • #60
                                my tip:

                                layers, layers, LAYERS. get into the habit of using the layer manager. organizing by layers is so crucial if a project transfers from one artist to another multiple times.

                                gilicom, you just blew my mind!

                                i have a question that has been frustrating me for a couple days now:

                                how do you set the default material in the material editor to be 'vray material', rather than 'standard'? so in essence, when (in max you select 'reset material slots' in the utilities panel in the material editor, i want all the slots to be replaced with vray materials.

                                i know it can be done, but i can't for the life of me recall how i did it before.

                                Comment

                                Working...
                                X