 Tweet
Tweet
After we got the first glimpse from the new Framebuffer we knew this could be a really cool tool in the future. Some of us thought almost a week about how to improve the Vray Framebuffer. This is what we came up with. (thanks tom, thanks egz) Let's go:

Introduction
Since we heard from the VrayFramebuffer the first time and it’s ability to change Exposure in Realtime we thought about this new kind of workflow and how one could improve it.. With one of the latest Vray internals, we finally had this wonderful tool in our hands and Ideas to improve it just popped out of our brains. This Document is a collection of Ideas to improve the Workflow in the Vray Framebuffer significantly. It consists of several tools that work together seamlessly and let you do many things “non-destructive” and “non-linear”.
To make this approach possible as much scene/metadata as possible have to be saved in a File. We suggest to do this directly in the *.vrayimg Fileformat. Furthermore a good lossless compression algorithm for this Format must be included cause it’s the goal to save everything Vray actually renders. Files would be just too big without a good compression.
The things we changed/included are better Exposure, better distributed Rendering, Renderlayers and finally a Renderhistory that brings all the things together. Most of these things are already in Vray technically but we try to get as much as possible out of them by putting them all in a well thought Interface. Most of our tools are located in a window called “Frame buffer Tools”. We played through several possible Interfaces and decided to just take your “Exposure” Window and throw in some Tabs. These Tabs make it possible to get many options in a small window. At the same time they work together very well. You could customize them like in Photoshop. You could for example make one tab floating or dock them together again in a different order.
We made sure all our changes could work in the Vray Standalone Version too. With our Ideas (and we’re sure you guys have some too) the Vray Framebuffer could become the Main Window when working with Vray. We really thought about the tools an we’re sure it will be a joy to work with. Everything works perfectly together and feels logical and intuitive.
No other renderer has something like this. Some of them already have Realtime Exposure, some have smart solutions for Renderelements and there are also scripts for a render History but no one brings it all together to give the User total control.
We hope we can contribute with this Interface something to the development of Vray and make it a better Product. (And of course we hope you implement our stuff 1:1 )
)
New Options in the Render Dialog
G-buffer and Elements have been moved to the Render Elements area.
Under Vray:: Render Elements you setup all G-buffer channels and Elements you want Vray to render.
(Therefore they appear in the Render Elements Tab in the Framebuffer)
If you also want to save them as single Images/Sequences you only turn on the checkmark and specify a path.
You can save different Elements to the same directory by just dragging a region over the channels and specify a path. This overwrites all other paths of the Elements.
Only those Elements with checkmarks get saved as single images or Image Sequences!
Furthermore you should have the ability to save G-Buffer/Elements combos to a Combustion File or to the PSD Format.
You may notice, that we´ve taken the Options for PSD Output directly from the psd manager from cebas, because it’s a fantastic plugin, saving you hours in single image jobs and it has a good Interface.
So we know layout changes might be neccesairy, for not getting into trouble with them. The new Elements Tab will replace the current solution for selecting Channels for Vray to render. (We forgot to implement the Idea of a Preset dialog for renderelements in this Picture ).
).
New options in the Render dialog

EGZ build in some new buttons in the Exposure Settings:

The Renderhistory
The Renderhistory is the heart of our Interface Improvements. Every Image you render gets saved (as a vrayimg File) in the History including EVERY Information Vray renders. (Render Elements, Vray Messages and Framestamp data) You can specify the Place and the maximum Size of the History Folder. When you Change the Location of the Folder, the History displays all Vray Images in that Folder so you can make different Folders for different Projects. You can archive a Project by simply putting all Vray Images together in a *.rar File.
When you want to load a picture of an old Project you just unrar the project into a folder, point the History to that location and voilà, all Images appear in the History List. You doubleclick on your desired Image and it get’s loaded in the VrayFrameBuffer main Window. (Either in the “A” or “B” Slot) Because everything is “non destructive” you can still change the exposure, put a frame stamp on top or look at the render elements of that Picture.
Renderhistory

The Layermanager
One of the biggest improvements of Vray 1.5 is the ability to render all G-Buffer Channels and Elements you need. Management of these new Channels finds place in the Layermanager tab of the new
“Frame buffer tools” window. EVERY render element Vray renders appears in the Layer Manager - not only those you specified to be saved as a seperate image/sequence.
By using drag and drop to the Slot Buttons (A ore B) in the top of the new Vray framebuffer window you copy a channel to the VrayFramebuffer. You can also doubleclick a channel to load it in the actual pressed Slot Button. By right clicking mouse on the Slot Button removes the Image (Channel) from the Slot. The two slots make it Possible to compare two Images similar to the controls in the Ramplayer. These Images can Layers from the Layer Manager or Documents from the Render History. When loading two Images you’ll get two silding lines which brings you more Freedom than just one Line in the RamPlayer. For example you can invert the “A” and “B” Slot parts in the Framebuffer dragging one line over the other. The colors on top of your Image indicate which Image is loaded in what Slot
Layermanager

Teamwork
Renderhistory and Layer Manager really get powerfull when working together. By using the renderhistory, you can choose a previously rendered Image - then you switch to the Layer Manager to determine which channel of the selected Image you want to see. This way you can compare Everything with everything else. Images that are rendered some time ago can be compared with your just rendered Images, Images with their own Imaps or two Imaps of two seperated Images (so you can compare changes in the sample point distribution.) This combination is really powerfull and gives you the Freedom to really analyse what you rendered – in one image with Layers and over time with different Images/Layers.
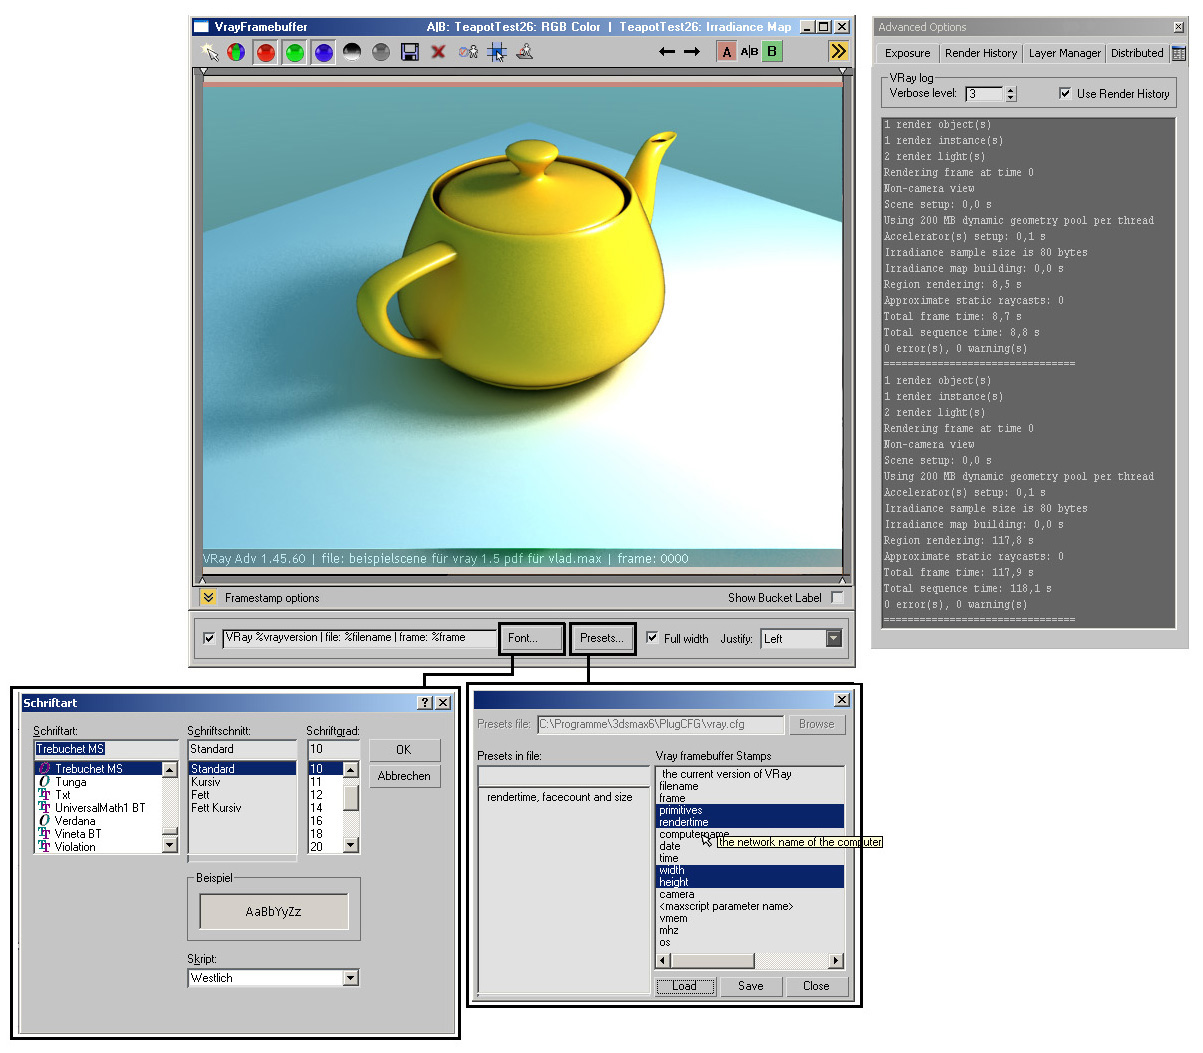
The new non-destructive Framestamp
Like everything else, the new framestamp works together with the non-destruktive workflow of the new vray-vfb tools. The information of the framestamp always shows the informations of all actual displayed renderings/renderlayers in slot “A” or “B”. If you load two immages, you’ll get two framestamp Infos seperated by the sliding lines for “A” and “B”.
At the bottom of the Vray vfb Main Window you’ll find a button to turn on the options for the framebuffer stamp. Inside you can turn on whatever you want and display it in the VFB Window by clicken the checkmark beside it. You can use presets to load your usual infos. Everything is non-destructive because all nessessairy data is saved in the metadata of the Vray Images.
Framestamp
The Distributed Tab
We moved the Distributed Rendering Settings to the Vray Framebuffer Tools to integrate them in the new Workflow.
Biggest improvement is, that you can interactively force vray to render certain buckets with certain machines. You do this by simply dragging some Buckets you selected with the SmartArrow (first Symbol in the Buttons on top of the Main Window) on a certain machine. A little menu appears where you can choose if you want only this machine to render the selected Buckets or distribute them over all michines in the list.
This works together with the new “Show Bucket Label” checkbox, that turns on or of the renderbucket labels on the bottom of the new Vray vfb.
Distributed Rendering

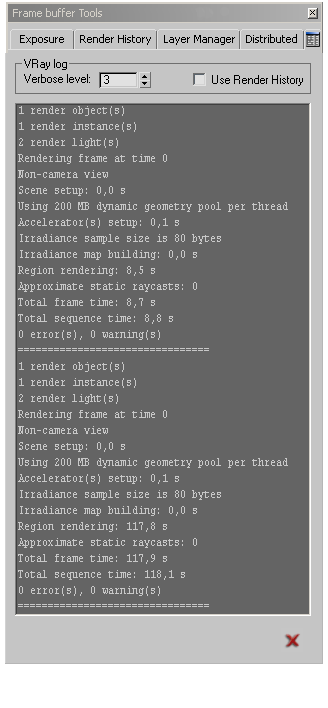
New Console
Finally we build in the Console that is also "non-destructive" now. You can change the verbose level interactively and clear it. Verbose should also work with old renders from the Renderhistory.
That's it basically. As you may see not everything is explained into detail. There are more thoughts in there than you see so if you have Questions don't hesitate to ask. Tom, egz and myself are willing to answer. If you have more Suggestions, let's hear them!
Here's everything as PDF: Interface Improvements
Let's hope we will see this in Vray sometime.
Introduction
Since we heard from the VrayFramebuffer the first time and it’s ability to change Exposure in Realtime we thought about this new kind of workflow and how one could improve it.. With one of the latest Vray internals, we finally had this wonderful tool in our hands and Ideas to improve it just popped out of our brains. This Document is a collection of Ideas to improve the Workflow in the Vray Framebuffer significantly. It consists of several tools that work together seamlessly and let you do many things “non-destructive” and “non-linear”.
To make this approach possible as much scene/metadata as possible have to be saved in a File. We suggest to do this directly in the *.vrayimg Fileformat. Furthermore a good lossless compression algorithm for this Format must be included cause it’s the goal to save everything Vray actually renders. Files would be just too big without a good compression.
The things we changed/included are better Exposure, better distributed Rendering, Renderlayers and finally a Renderhistory that brings all the things together. Most of these things are already in Vray technically but we try to get as much as possible out of them by putting them all in a well thought Interface. Most of our tools are located in a window called “Frame buffer Tools”. We played through several possible Interfaces and decided to just take your “Exposure” Window and throw in some Tabs. These Tabs make it possible to get many options in a small window. At the same time they work together very well. You could customize them like in Photoshop. You could for example make one tab floating or dock them together again in a different order.
We made sure all our changes could work in the Vray Standalone Version too. With our Ideas (and we’re sure you guys have some too) the Vray Framebuffer could become the Main Window when working with Vray. We really thought about the tools an we’re sure it will be a joy to work with. Everything works perfectly together and feels logical and intuitive.
No other renderer has something like this. Some of them already have Realtime Exposure, some have smart solutions for Renderelements and there are also scripts for a render History but no one brings it all together to give the User total control.
We hope we can contribute with this Interface something to the development of Vray and make it a better Product. (And of course we hope you implement our stuff 1:1
)New Options in the Render Dialog
G-buffer and Elements have been moved to the Render Elements area.
Under Vray:: Render Elements you setup all G-buffer channels and Elements you want Vray to render.
(Therefore they appear in the Render Elements Tab in the Framebuffer)
If you also want to save them as single Images/Sequences you only turn on the checkmark and specify a path.
You can save different Elements to the same directory by just dragging a region over the channels and specify a path. This overwrites all other paths of the Elements.
Only those Elements with checkmarks get saved as single images or Image Sequences!
Furthermore you should have the ability to save G-Buffer/Elements combos to a Combustion File or to the PSD Format.
You may notice, that we´ve taken the Options for PSD Output directly from the psd manager from cebas, because it’s a fantastic plugin, saving you hours in single image jobs and it has a good Interface.
So we know layout changes might be neccesairy, for not getting into trouble with them. The new Elements Tab will replace the current solution for selecting Channels for Vray to render. (We forgot to implement the Idea of a Preset dialog for renderelements in this Picture
New options in the Render dialog
EGZ build in some new buttons in the Exposure Settings:
The Renderhistory
The Renderhistory is the heart of our Interface Improvements. Every Image you render gets saved (as a vrayimg File) in the History including EVERY Information Vray renders. (Render Elements, Vray Messages and Framestamp data) You can specify the Place and the maximum Size of the History Folder. When you Change the Location of the Folder, the History displays all Vray Images in that Folder so you can make different Folders for different Projects. You can archive a Project by simply putting all Vray Images together in a *.rar File.
When you want to load a picture of an old Project you just unrar the project into a folder, point the History to that location and voilà, all Images appear in the History List. You doubleclick on your desired Image and it get’s loaded in the VrayFrameBuffer main Window. (Either in the “A” or “B” Slot) Because everything is “non destructive” you can still change the exposure, put a frame stamp on top or look at the render elements of that Picture.
Renderhistory
The Layermanager
One of the biggest improvements of Vray 1.5 is the ability to render all G-Buffer Channels and Elements you need. Management of these new Channels finds place in the Layermanager tab of the new
“Frame buffer tools” window. EVERY render element Vray renders appears in the Layer Manager - not only those you specified to be saved as a seperate image/sequence.
By using drag and drop to the Slot Buttons (A ore B) in the top of the new Vray framebuffer window you copy a channel to the VrayFramebuffer. You can also doubleclick a channel to load it in the actual pressed Slot Button. By right clicking mouse on the Slot Button removes the Image (Channel) from the Slot. The two slots make it Possible to compare two Images similar to the controls in the Ramplayer. These Images can Layers from the Layer Manager or Documents from the Render History. When loading two Images you’ll get two silding lines which brings you more Freedom than just one Line in the RamPlayer. For example you can invert the “A” and “B” Slot parts in the Framebuffer dragging one line over the other. The colors on top of your Image indicate which Image is loaded in what Slot
Layermanager
Teamwork
Renderhistory and Layer Manager really get powerfull when working together. By using the renderhistory, you can choose a previously rendered Image - then you switch to the Layer Manager to determine which channel of the selected Image you want to see. This way you can compare Everything with everything else. Images that are rendered some time ago can be compared with your just rendered Images, Images with their own Imaps or two Imaps of two seperated Images (so you can compare changes in the sample point distribution.) This combination is really powerfull and gives you the Freedom to really analyse what you rendered – in one image with Layers and over time with different Images/Layers.
The new non-destructive Framestamp
Like everything else, the new framestamp works together with the non-destruktive workflow of the new vray-vfb tools. The information of the framestamp always shows the informations of all actual displayed renderings/renderlayers in slot “A” or “B”. If you load two immages, you’ll get two framestamp Infos seperated by the sliding lines for “A” and “B”.
At the bottom of the Vray vfb Main Window you’ll find a button to turn on the options for the framebuffer stamp. Inside you can turn on whatever you want and display it in the VFB Window by clicken the checkmark beside it. You can use presets to load your usual infos. Everything is non-destructive because all nessessairy data is saved in the metadata of the Vray Images.
Framestamp
The Distributed Tab
We moved the Distributed Rendering Settings to the Vray Framebuffer Tools to integrate them in the new Workflow.
Biggest improvement is, that you can interactively force vray to render certain buckets with certain machines. You do this by simply dragging some Buckets you selected with the SmartArrow (first Symbol in the Buttons on top of the Main Window) on a certain machine. A little menu appears where you can choose if you want only this machine to render the selected Buckets or distribute them over all michines in the list.
This works together with the new “Show Bucket Label” checkbox, that turns on or of the renderbucket labels on the bottom of the new Vray vfb.
Distributed Rendering
New Console
Finally we build in the Console that is also "non-destructive" now. You can change the verbose level interactively and clear it. Verbose should also work with old renders from the Renderhistory.
That's it basically. As you may see not everything is explained into detail. There are more thoughts in there than you see so if you have Questions don't hesitate to ask. Tom, egz and myself are willing to answer. If you have more Suggestions, let's hear them!
Here's everything as PDF: Interface Improvements
Let's hope we will see this in Vray sometime.
Comment