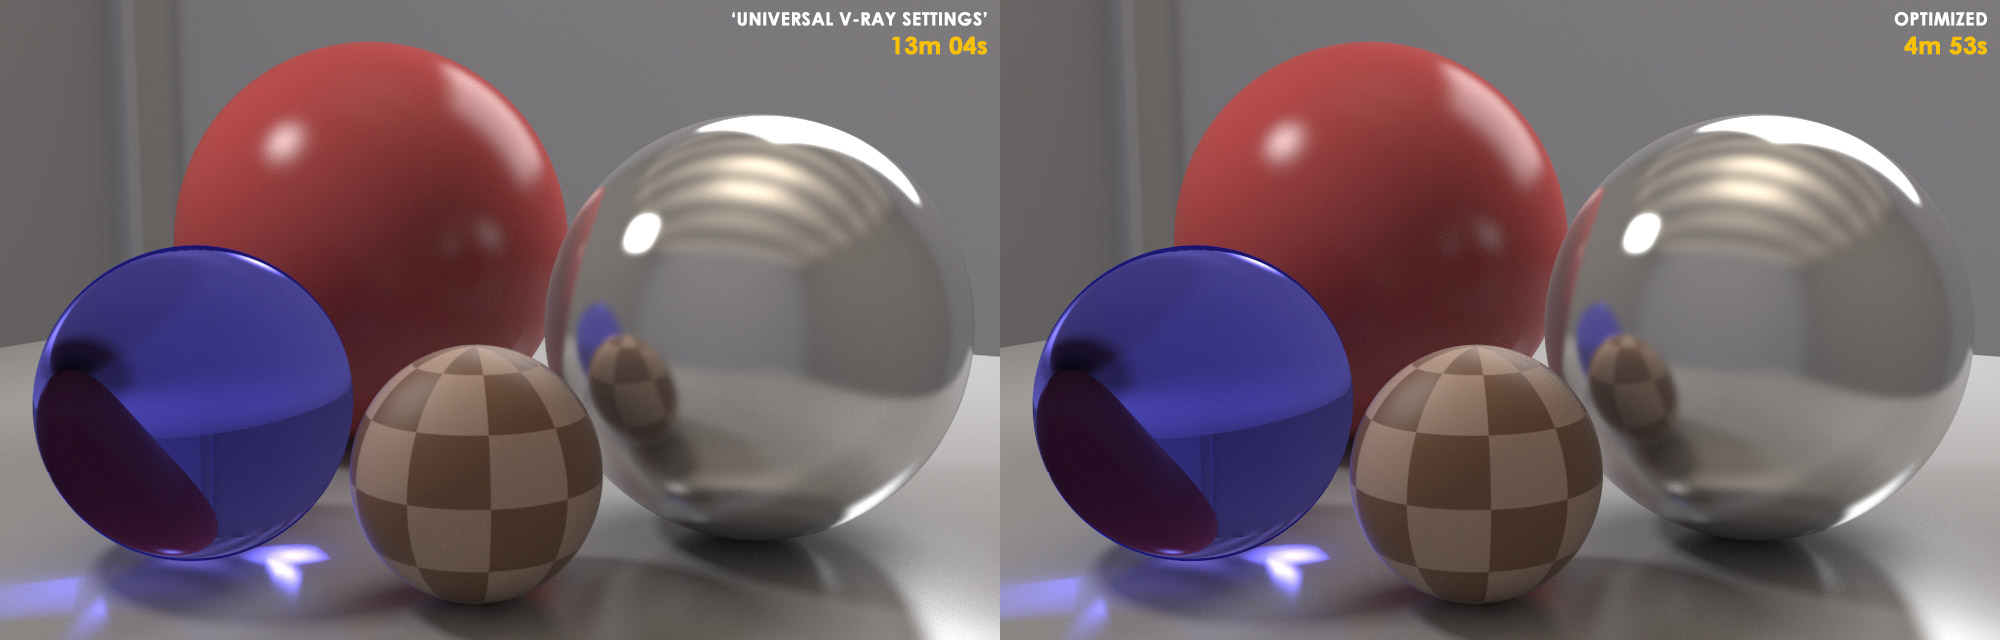
There can often be a lot of confusion surrounding the topic of V-Ray’s sampling and what ‘ideal’ settings are. Many times you’ll see artists adopt the ‘Universal V-Ray Settings’ of having the Image Sampler (Anti-Aliasing) Max Subdivs value set very high (like 50 or 100), and then simply lowering the noise threshold value until the render becomes clean enough - thinking that it’s the best / fastest that V-Ray can do. But with a bit of understanding of how V-Ray works under the hood, you can achieve a higher quality result WITH faster render times - in some extreme cases nearly 3x faster than the universal settings can give you.
This article is designed to be an essential, step-by-step guide on how to Optimize any render in V-Ray.
I’ve tried my best to make the information as simple and clear as possible for a complex topic like this - but there’s always room for improvement.
So I’m sharing it here first with the V-Ray community for a bit of feedback and discussion. Take a look, try it out, share your findings, and please let me know if you have any feedback!
I’m also planning on adding some production Before/Afters to the article later this week, so if you can, share your Before/After images!
Akin, a great write up. Thanks for sharing! We can’t have enough ways explaining this process, and I think the more people chiming in the clearer it starts to become. Thanks again
thanks a lot for taking your time to make this guide, well done
Could you please elaborate a this tip: “unlinking the Image Sampler’s Color Threshold value from the DMC Sampler’s Noise Threshold and increasing it in small increments to help the Image Sampler not confuse DMC Noise for geometric or textural detail”
IMHO this thread is going to explode in a few days
John! The more the merrier! I’d LOVE to read what you’re cooking up too - maybe then the word will finally get out. I credited you in the tutorial - thanks for the knowledge you’ve shared!
Sure - I’ve updated the tutorial to make it a little more clear… but it’s done by unchecking the ‘Use DMC Sampler Threshold’ checkbox, which allows you to adjust the Image Sampler’s Color Threshold value independently from the DMC Sampler’s Noise Threshold value. Hope that makes sense.
So I take it that after you’ve successfully balanced a scene, if you’re working with a single or separate noise thresholds, you would shift them both higher if you needed faster renders? So that becomes the sole throttle for speed vs quality.
Rockin tutorial man. I’m going to put some of my complex scenes thru these optimizations and will report back on successes! Great write up! I think it’ll change the game for some people and half my artists!
Fantastic tutorial and information Akin, thank you so much.
And it seems perfect timing as it goes so well with the great training currently being offered by Grant as well.
So, big kudos to you Akin - you’re helping me get to grips with what is under the hood of VRay
One question…
Seeing as the SampleRate pass is so important (and I only learnt about this render pass a week ago) - is it possible to switch off the rendering (‘beauty’) pass during its creation ? In other words is it possible to render which ever passes you want (in this case the Samplerate pass) without creating a Render Image ? (since at these early stages, the Samplerate, reflection, GI passes are where the important information is).
Right - just remember though, as you lower the AA’s color threshold it’ll introduce more red pixels into your SampleRate, so you’ll probably have to raise the Image Sampler (AA) values, which in turn means you’ll have to adjust the scene’s subdivisions as well (since the new higher AA value will be dividing the number of secondary samples more).
Cheers man! Your video did a great job covering the procedure as well!
As vlado pointed out - no, you cant have a SampleRate pass without actually rendering an image. This is why in the procedure listed in the tutorial, we turn almost everything else off in the scene so we can tune the Image Sampler (AA) quickly without having to wait for everything in the scene to calculate.
Great seeing the positive responses so far! I hope it’s clear and easy to understand to those new to the topic! Please let me know if not!
Thanks for taking the time to write this, a great reference to come back to. Can I ask, should you always do your testing at the full resolution you are planning to render at?
Also, just a thought, but might be worth mentioning the importance of getting a smooth noise-free light cache solution first before looking at DMC settings.
If the noise threshold controls when the sampler stops adding additional rays.. what’s the reason not to max out everything, max subdivs, max DMC sampler, and then use the noise threshold to limit the quality?
No, there’s no need to do tests at full res - you can optimize your scene at a lower resolution, and then once you’ve got it tuned, the speed/quality gains should scale accordingly as you go back to full-res. Just be careful you don’t go TOO low res for testing, or V-Ray may have a harder time trying to resolve smaller details in the scene.
Well you’ve kinda just described the ‘Universal V-Ray Settings’. And don’t get me wrong, the universal settings have their place and work just fine for some scenes… but the reason why it isn’t always the best choice is what the tutorial is all about: Basically the higher you set your AA settings, the lower all the other settings in your scene becomes (because of the way V-Ray balances the Image Sampler and DMC Sampler internally) - which can lead to noisier and slower renders than if you were to balance the Image Sampler and DMC Sampler manually according to the demands of the scene. Makes sense?
Thank you RokinAkin, really useful tutorial u realized. I was searching for something like this, to clarify as well as possible the way vray works. Especially for me with my bad english, a direct and specifically thinked tutorial is ver very useful.
Thanks a lot
Great write-up, and perfect as a sanity check for the brain. Mixed feelings though, as I had really hoped I would learn something new that would make my life easier, but happy that I haven’t been completely wrong and stupid.
One aspect I would really like to see more info on in regards to this, is the “adaptive amount” value, how it works, and if it can be usefully tweaked to further optimize.
Also, could one just use the “Global Subdivs Multiplier” to up all the secondary samples to a certain point for the optimization stage, and then just slightly tweak the individual samples for lights and materials as needed afterwards?
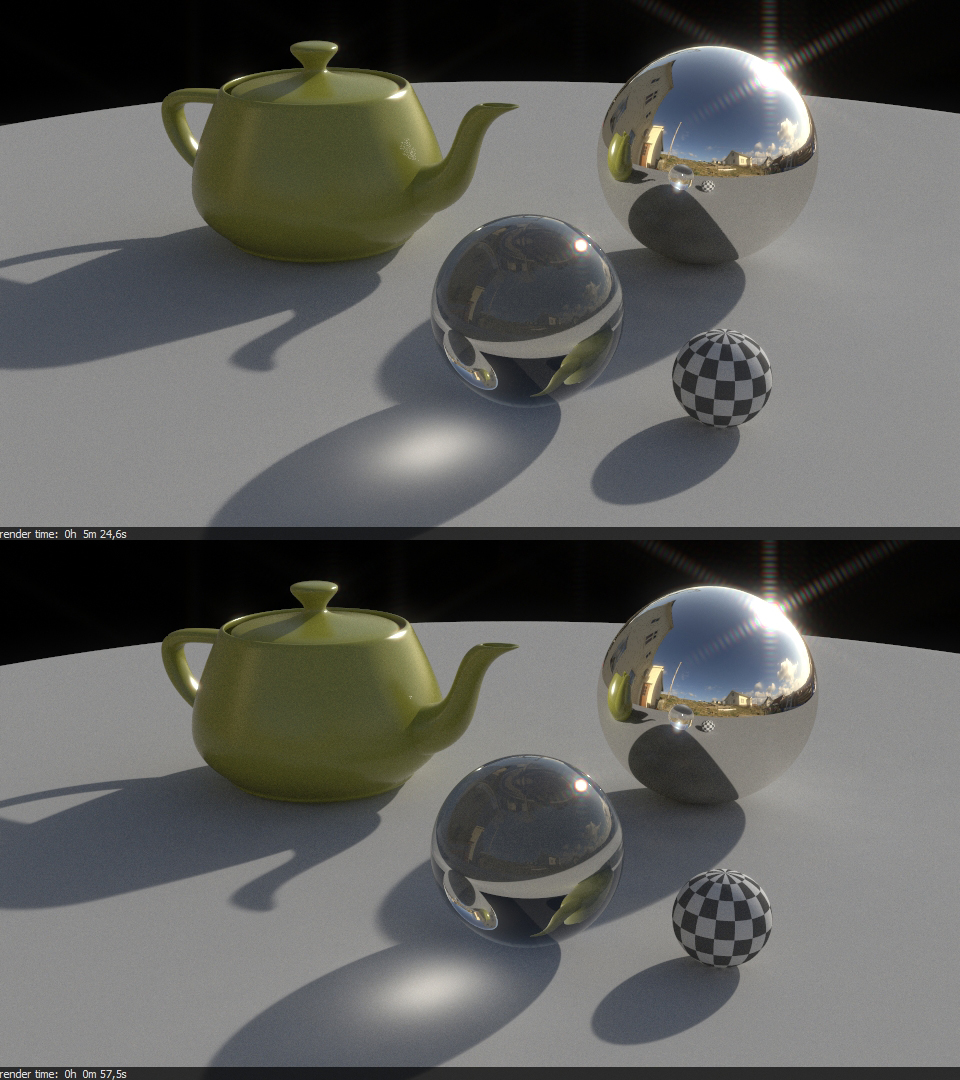
I followed your procedure with a similar scene setup accompanied by one of my high resolution, sun-light hdri (which often is a challenge in and of itself regarding noise) to see how much faster I could get the renders while remaining the quality and level of noise. Bear in mind, I chose to allow for some noise to keep the renders around 5 minutes:
Top: Universal settings
Bottom: Optimized
As you can see, the noise are fairly identical in both renders, but the first render took 5.6x longer. That is just crazy.
Edit: Thumbnailed the image. Click on it for full size.
